Using Language IO Help for Oracle Service Cloud Desktop Application
Overview
The Language IO Help desktop application pulls Answer content from the Oracle Service Cloud (OSvC) repository, marshals that content into localization packages and imports translated OSvC Answer content back into OSvC. This documentation will cover use of the Language IO Help application for OSvC. The categories of functionality are divided as follows.
- Installing and launching the Language IO HELP desktop application
- Pulling answer content from OSvC for translation
- Pushing translated content back into OSvC
- Reading Language IO Help Log Files
- Reading Language IO Help Manifest Files
- Debugging tips
Installation and launch
The Language IO Help desktop application is a Java application. You can run it on recent versions of Windows and Mac operating systems. It is installed and launched from a web page via Java Web Start at https://www.golinguist.com/linguistnow/oracle_login.jsp .
The URL should be accessed in Safari or Firefox. Internet Explorer does not work with the server restrictions on port 80, and Google Chrome does not support the latest version of Java.
Your launch page should look like this (Version numbers may be different):
- Once you submit your OSvC username and password, the page refreshes with a Launch button and explanatory text. Click the Launch button to download the Language IO application to your computer.
- You will be asked to accept a certificate from Language IO. Before you accept, check the box to agree to always accept certificates from this source. Then, accept.
- If you are launching the Language IO Help desktop application for the first time, or if a new version is available, there will be a download before the desktop application opens.
- Once the client launches, another login window opens. Re-enter the same credentials as in Step 1.
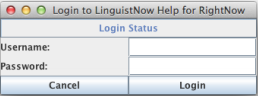
- If the credentials you entered are not valid, a message appears to ask you to re-enter your credentials. If the credentials are accepted by OSvC, the Language IO Help desktop application will launch as shown in the next image. The text at the top of the window may vary depending on the version of OSvC that Language IO is connected to.
Pulling answer content from OSvC for translation
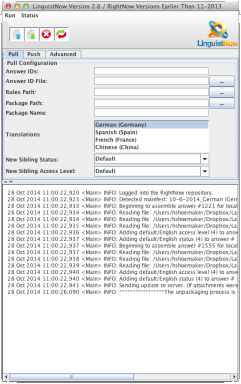
To pull answer content from OSvC for translation, first enter a number of configuration values. The top, tabbed panel within the application is dedicated to configuring the content Push and Pull processes. For that reason, both a Push tab and a Pull tab are visible. Depending on your application configuration, you might also an Advanced tab.
The Advanced tab allows you to edit your OSvC connection settings. It is pre-populated with default connection parameters including the username and password you entered into the launch page.
All values on all tabs are saved automatically. When you restart the application, it keeps the values from your last session.
Pull Configuration
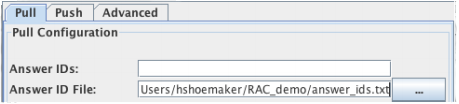
The Pull tab contains a number of configuration fields that you must complete in order to pull Answer content from your OSvC repository to your local computer.
Answer IDs
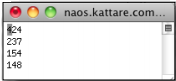
In the Answer IDs text field, enter the OSvC Answer IDs you want to pull from your OSvC repository to your local machine. Each ID must be separated by a comma and no spaces. If you wanted to pull answers 7282 and 7283 you would enter them into the Answer ID field as show below. This is one of two options for specifying the answers you want to pull. In the next field (Answer ID File) you can point the application to a plain text file that contains all of the answer ids (one per line) that you wish to pull down. The file option is a better option for pulling many answers at once. If you are only pulling a few answers, the direct entry field is recommended.

Big Comment File
The big comment file is for commenting out large sections of content to hide it from the linguists. The file needs to have one regular expression per line and that entire regular expression will be commented out in the files.

In this example, any content covered by the <h1>.*?</h1> such as <h1>Hi</h1> would be converted to <!--<h1>Hi</h1>--> so that it doesn't get translated.
Answer ID File
If you are pulling many answers at the same time, it is more efficient to point the application to a file containing all of the answer IDs. The file should be a plain text file created in a text editor such as Notepad++ or TextEdit, and should contain no additional formatting. Do not use MS Word, Pages or other word processing tools that apply special formatting. Enter one ID per row (see example below). Navigate to your file by clicking on the button next to the Answer ID File text field. Browse to its location and select the file. The extension of the file must be “.txt.”
Rules Path
The value in the Rules Path field points the application towards a directory that contains one or more files containing regular expression rules. The application uses these regular expressions to perform locale-sensitive parsing of Answer content. These files are specific to your installation. They will be provided to you by your Language IO account manager, who will create them during the product installation and setup process.
Push the button next to the Rules Path text field to navigate to the directory in which one or more rules files are stored. All rules files must end with either the “.rules” extension. Once pointed at the directory containing the rules files, the application will pull in all rules defined in all of the rules files that live in that directory

Rules are used by the application to perform locale-sensitive parsing of the English HTML before the HTML content is placed into localization packages. It is recommended that you do not edit these files unless you are familiar with regular expressions and HTML syntax. Let’s look at a rules file:

Each rules file has five, tab-delimited columns. Each of these columns is used when the application is parsing HTML content.
- The first column contains a RightNow language ID. In the above example, the application sees 9 and understands that this rule applies only to French answers because 9 is the RightNow ID for the French locale.
- The second column, which contains <[aA]\b[^>]+> in the above example, is a regular expression that tells the application to search for all anchor tags embedded in the HTML content of the answer.
- The third column is the exceptions column. If a detected anchor tag contains the exception pattern within the tag, it leaves this tag alone. If it contains the value ‘0’ (without single quotes), no exceptions exist for this pattern.
- The fourth column is a regular expression that finds the portion of the anchor tag that Language IO will rewrite.
- The final column contains no regular expression syntax, only the replacement text for portion of the anchor tag that we want to rewrite.
So using the first rule as the example, if we are creating the French localization package (9) and within the Answer text we find an anchor tag that contains http:\\surveymonkey.com inside the href attribute of the anchor tag, and it does NOT contain /s/ in the href portion, Language IO replaces http:\\surveymonkey.com portion of the tag with http:\\aide.surveymonkey.com (the link to the corresponding French web page on the SurveyMonkey website).
For more information about the regular expression syntax supported within Language IO files, see the util.regex documentation.
Package Path
This Package Path text field tells the application where to store and package the content that is being pulled down from your OSvC repository and stored on your local computer. It accepts only directory values. Click on the button next to the text field to navigate to the directory where you wish to store the content or to create a new directory.

Package Name
The Package Name field is where you enter the base name for the localization packages that the application will create when it pulls the content down from the OSvC repository for localization. The Application will append this name with the name of the locale. So if you enter a base name of RN_DEMO, the French localization package will be named RN_Demo_French.

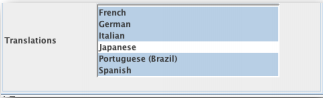
Translations
The Translations list allows you to select all the locales for which you want the application to create localization packages. The list contains all locales currently supported by your OSvC repository. You can select one or many locales and for each locale selected, a locale-specific localization package will be created when you pull down the English content that requires translation. In the below example, we have selected to create localization packages for French, German, Italian, Portuguese (Brazil) and Spanish, but not Japanese.
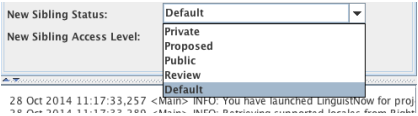
New Sibling Status & New Sibling Access Level
When Language IO pulls English Answers out of OSvC for translation, it simultaneously checks that there is a location to put translated Answers upon delivery. Within OSvC, this location for the translated version of an Answer is called a Sibling Answer. A French translation of an English Answer is always associated with the original English Answer via a Sibling relationship.
If Language IO has already pushed a translation for a given English Answer into OSvC, this means a Sibling Answer already exists and Language IO simply records the ID of that Answer so it knows where to push the new translation when it is ready. If an English Answer has never been translated before, Language IO creates an empty placeholder Sibling and records the ID to push the translation there when it is ready. That placeholder Sibling Answer, like every Answer within OSvC, has to have both a Status and an Access Level when it is created. These values dictate whether the Answer is publicly viewable, or not, and what types of users can access it.
The two drop-down lists (New Sibling Status and New Sibling Access Level) allow you to specify what Status and Access Level the newly created placeholders will have prior to pushing in the translation. If you leave “Default” selected, they will keep the same Status and Access Level as the original Answer.
The New Sibling Answer Status and New Sibling Answer Access Level drop-down lists are populated with all status values defined in your OSvC repository, including custom statuses.
Pulling & Packaging Content
Once you have completed the configuration on the Pull tab, and you have content in your OSvC repository that is ready for translation, you are ready to pull and package content for translation.
This process reads in the Answer IDs, pulls these Answers from OSvC, and packages the content into one folder for each locale selected in the Translations list.
The Pull process also performs a number of formatting tasks that are locale specific. This means that before the content is translated, the content that lives in the French package is already different from the content that lives in the Spanish package.
Execute the Pull Process
There are two ways you can start the content pull process. The first option is to click on the Pull button. In the screen shot below, this is the button with the blue arrow pointing up, the first button on the left. You can also launch the Pull process by navigating to Run=>Pull in the menu.
Cancel the Pull Process
Once you have started the pull process you can cancel it either by clicking the Cancel button (the red button with the white X), or by selecting Run > Cancel Pull from the menu.
Pull Status
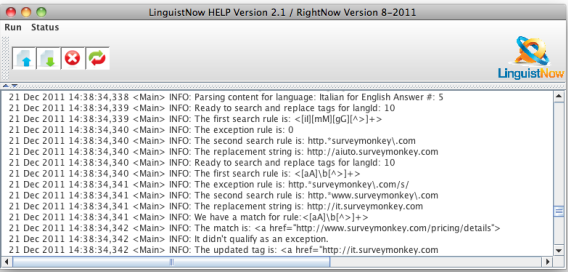
While the process is running, you can see its status in the status panel, as shown in the image below.
Clicking on the small up arrow at the top left of the status area to hide the configuration panel and focus on the status. You can also scroll inside the status panel by moving the scroll bars or resizing the screen to better view all of the status messages.
You can also clear the status panel. To do so, Right-click inside the status panel and select Clear, or click the Clear icon in the toolbar (the rightmost button with green and red arrows).
Localization Package Structure and Handling
It is important to tell your linguists that the localization packages created during the pull should not be combined, taken apart or - besides translating the HTML files - altered in any way. The directory structure that is pulled should go to the linguist exactly as it is and once translated, pushed back into OSvC with its original structure intact.
Each package contains two types of files: HTML files and a single XML file. Each HTML file (which will have an .html extension) should be translated. The XML file should not be touched unless you are an expert in Language IO HELP Manifest syntax. The contents of a single localization package look as shown below. In the example below, the name of the locale-specific directory (or localization package) is 11_15_2011_French.
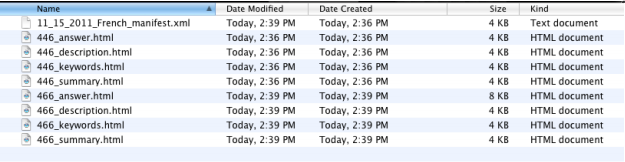
Language IO creates one .html file for each element of a OSvC Answer that is pulled for translation. These elements include the Answer text itself, the Description, The Keywords and the Summary. Keywords are not required.
The XML file always has an .xml extension and is titled [Package_Name]_manifest.xml, where [Package_Name] is whatever you specified in the Package Name field on the Pull configuration tab. This manifest file includes a link to each file in this package. It also includes the Answer ID for each answer along with other pertinent answer information.
Do not edit this file if you are not familiar with the syntax of Language IO HELP manifest files. While each of the files in the localization package can be translated, do not move them to different directories.
If you add new files to the package, the application ignores them unless the manifest file is manually edited to include them.
Pushing translated content back into OSvC
From the push tab, you can configure the application to push translated content from your local machine into your OSvC repository.
Push Rules Path
This is identical to the functionality provided by the Pull Rules Path, except in reverse.
Link Localization Path
This file holds translations of the phrase "(In English)" (without quotes) so that if a localized OSvC link cannot be found, the end user is told that the link they are clicking on goes to an English link. The first column is the OSvC language code. The second column is the translation for "(In English)". The two columns are tab separated:

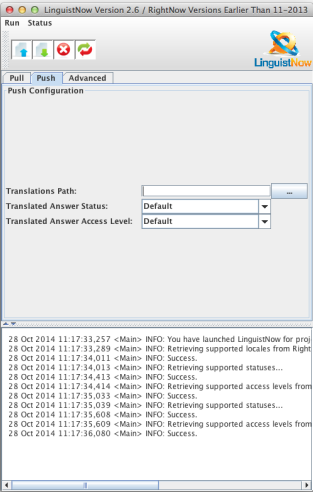
Translations Path
The Translations Path field holds the path to the parent directory where the application looks for language specific sub-directories that contain the translated files.
Example:
- You created two localization packages named
11_15_2011_Frenchand11_15_2011_Spanishduring the Pull process. You sent these two directories to the linguists for translation. - Upon delivery by the linguists, you save each of these directories under a common parent directory such as: C:\translated_files, like this:
C:\translated_files\11_15_2011_FrenchC:\translated_files\11_15_2011_Spanish - You select the button next to the Translations Path field to navigate to and select
C:\translated_files. - The application will search through each sub-directory inside
C:\translated_fileslooking for the manifest file and the referenced, translated .html files.
Translated Answer Status and Translated Answer Access Level
In most cases, you can leave the Translated Answer Status and Translated Access Level values as Default. This means that the translated Answers inherit the same Status and Access Level as the original Answer. For example, if an original English answer was pulled for translation that had the status set to Public, the French and Spanish translations, when pushed, also have their status set to Public.
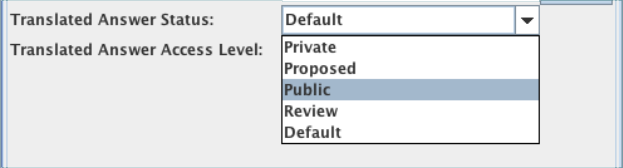
However, if you want to override the original English answer Status or Access Level and set the Status or Access Level of all translated Answers to Private Status or Everyone Access Level, you can do so by setting the status value accordingly in the Translated Answer Status and Translated Answer Access Level drop-down lists. This sets the selected Status or Access Level for every pushed answer, including the newly created placeholder answers generated by Language IO, regardless of what was selected for New Sibling Status and New Sibling Access Level upon their creation.
The Translated Answer Status and Translated Answer Access Level drop-down lists are populated with all status values defined in your OSvC repository, including custom statuses.
Pushing Translated Content
Once you have:
- pulled content from OSvC using the Language IO HELP desktop application, and
- this content is translated and delivered, and
- you have properly configured the Push tab,
You are now ready to push the translated answers into OSvC.
Execute the Push Process
There are two ways to push the translated content back into the system.
- You can click the Push button in the tool bar. This button is the second over from the left in the image below (the button with the green arrow pointing down).
- Alternatively, open the menu and go to Run > Push.
Cancel the Push Process
Once you have started the push process you can cancel it either by clicking the Cancel button (the red button with the white X), or by selecting Run > Cancel Push from the menu.
Push Status
While the process is running, you can see its status in the status panel as shown in the image below.
Clicking on the small up arrow at the top left of the status area to hide the configuration panel and focus on the status. You can also scroll inside the status panel by moving the scroll bars or resizing the screen to better view all of the status messages.
You can also clear the status panel. To do so, Right-click inside the status panel and select Clear, or click the Clear icon in the toolbar (the rightmost button with green and red arrows).
Reading Language IO Help Log Files
The status messages that display in the status panel of the application must be reviewed preferably during the process but at least after the process has completed. If the text INFO shows up near the beginning of a status message, all is well. These messages are intended to let you know what the application is doing at that particular point in time. However when you start to see WARN, ERROR, or FATAL showing up in those status messages something is wrong.
Types of Status Messages
This section describes the different levels of error messages, and their meaning.
WARN
A WARN message is usually something from which one can easily recover.
For example, if you manually enter the path to the translated files but leave a typo in the path, a WARN message pops up to tell you that a valid directory is required. At that point, simply enter a valid directory into the configuration field and start again.
ERROR
An ERROR message indicates a more serious issue. It typically results in the failure of one piece of your operation, but not the entire operation.
For example, when you push translated content back into OSvC, sometimes the translation of the answer summary exceeds the maximum 240 characters allowed by OSvC. In this case, the system throws an ERROR to tell you that this particular answer failed to update, and why. The rest of the answers, however, should be updated without any problem.
Once the process is complete, go back and fix the problematic answer, create a new package and re-upload this answer only.
FATAL
A FATAL message indicates that the entire push or pull operation failed. FATAL errors may be caused, for example, by incorrect connection information entered into the Advanced tab, a corrupted manifest file or by a package that has missing .html files.
You must fix these issues, then restart the entire operation.
Log Files
While it is important to scan through the status that is being output in the status panel during and after a process, the application also saves your log files to your hard drive as a safety precaution.
This can be useful if you see an error messages that you do not understand, and you need to send them to someone who can assist you. Every time you run the tool, the system creates a file, or several files, with a base name of RAC_Log.log.
The directory in which it is stored varies by OS:
- On a Mac, it uses the user’s home ($HOME) directory, which is named after your user.
- On a Windows machine, it is saved to your Desktop.
This file or files are overwritten with each execution. Make sure to copy the log file with a different name if you think you might need to refer to it later.
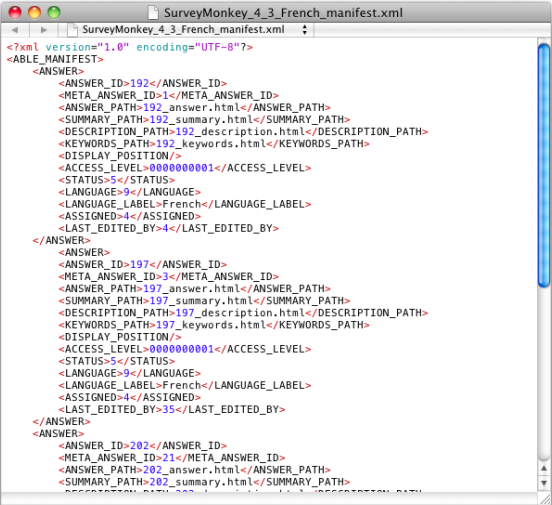
Reading Language IO Help Manifest Files
Manifest files are stored in a very simple XML structure. They are used to define all translatable files that exist in a localization package.
Answer IDs and Meta IDs
Each OSvC answer is represented by an element as shown in the example manifest below. The first sub element is the ID for that answer represented by a tag. Next comes the tag. A Meta ID is the English ID that corresponds to a localized answer. So if you look at the Manifest file for a French package (like the example below), the answer id is 192 which corresponds to the English answer with the answer id of 1.
File Elements
Next come the names of the html files that correspond to this answer including the actual answer file, summary file, keywords file and description files. All files defined in the manifest must exist in the directory, or the process will fail. It is also not possible to delete one of these elements from the manifest (such as summary.html) because you only need to update the keywords, for example.
The Application requires a file for all required pieces of the answer (summary, answer and description) before it will update any piece.
Misc. Answer Attributes
The remaining values map to elements such as the status of the original English answer, the access level of the original English answer, the user’s ID (this will vary by user and by repository. It is set both in last-edited-by and assigned), as well as language attributes.
Never edit these values unless you know what you are doing.
Debugging Tips
If you encounter "ERROR Push - Summaries are too long" follow these steps:
- Look at the line before the error to determine which summary is causing the error. In the example below
21062_summary.htmlis the offending summary.- Example:
WARN UnpackagerController [path to files]/[language specific sub directory]/21062_summary.html
- Example:
- Open this file (
21062_summary.html) in a text editor - Cut and paste the contents to a temporary file (for example,
21062_summary_TEMP.html) - Now that the summary file is empty, save the file.
- Retry the push
- If you get the same "Summaries are too long" error for a different summary, repeat steps 1 to 5 until it works.
- Once the push is complete, open the Answer in Oracle Service Cloud.
- Cut and paste the summary text from the temporary file (in the example above,
21062_summary_TEMP.html) into the Answer summary. - Save your changes.